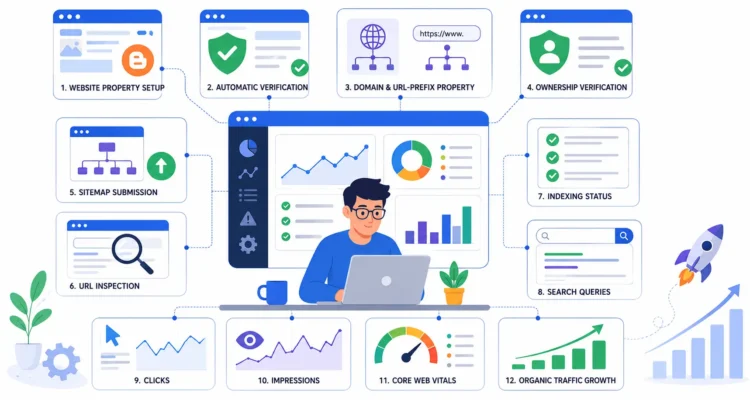
Connect Blogger to Google Search Console: 10 Easy Steps

If you want your Blogger website to grow through organic search, one of the most useful tools you can set up is Google Search Console. Learning how to connect Blogger to Google Search Console allows you to monitor search performance, indexing, sitemaps, search queries, clicks, impressions, and important technical information about your blog.
Google Search Console does not automatically improve your rankings, but it gives you valuable information about how Google sees your website. Once you connect Blogger to Google Search Console, you can check whether important pages are indexed, submit your sitemap, inspect individual URLs, review search performance, and identify issues that may prevent some content from appearing correctly in Google Search.
This updated guide explains how to connect Blogger to Google Search Console using the current Search Console setup. It also corrects several outdated Blogger tutorials that recommend unnecessarily editing robots.txt, adding multiple properties, or manually inserting verification tags when automatic Blogger verification is already available.
If you are still setting up your blog, first read our How to Create a Blogger Blog guide. You should also configure your Blogger settings and Blogger SEO settings before focusing heavily on search performance.
Table of Contents
What Is Google Search Console?
Before you connect Blogger to Google Search Console, it is important to understand what Search Console actually does.
Google Search Console is a free Google service that helps website owners monitor and troubleshoot how their websites perform in Google Search.
Search Console can provide information about:
- Search queries
- Organic clicks
- Search impressions
- Average search positions
- Indexed pages
- Sitemaps
- URL indexing status
- Core Web Vitals
- HTTPS status
- Links
- Manual actions
- Security issues
You can access the official Google Search Console directly from Google.
Once you connect Blogger to Google Search Console, the tool becomes one of the best places to understand whether Google is discovering your content and which search queries are already bringing impressions or clicks.
Is Google Search Console the Same as Google Webmaster Tools?
You may still see old Blogger tutorials referring to Google Webmaster Tools.
Google Webmaster Tools was the previous name of Google Search Console. The current product is Google Search Console.
Therefore, if an old article tells you to connect Blogger to “Google Webmaster Tools,” the modern equivalent is to connect Blogger to Google Search Console.
Why Should You Connect Blogger to Google Search Console?
There are several reasons to connect Blogger to Google Search Console, especially if organic traffic is part of your blogging strategy.
Search Console can help you:
- Confirm that Google knows about your website
- Monitor search queries
- See which articles receive impressions
- Measure organic clicks
- Submit sitemaps
- Inspect important URLs
- Identify indexing problems
- Monitor search performance over time
- Discover new keyword opportunities
- Review mobile and page-experience information
The main advantage is visibility into what is actually happening.
Without Search Console, you may publish dozens of articles without knowing whether Google is discovering them or which queries are triggering your pages.
That is why learning how to connect Blogger to Google Search Console should be one of the first SEO tasks after your blog structure and basic settings are ready.
Step 1: Make Sure Your Blogger Blog Is Public
Before you connect Blogger to Google Search Console, make sure the blog is publicly accessible if your goal is organic search visibility.
Go to:
Blogger → Settings → Permissions → Reader access
For a normal public blog, Reader access should be configured appropriately for public viewing.
You should also review:
Settings → Privacy → Visible to search engines
For a public website you want search engines to discover, this option should normally be enabled.
These settings do not guarantee indexing, but they help ensure that you are not intentionally restricting public or search-engine access.
Step 2: Open Google Search Console
The next step to connect Blogger to Google Search Console is opening Search Console while signed into your Google Account.
Visit the official Google Search Console.
Whenever possible, sign in using the same Google Account that manages the Blogger blog.
This is especially important because Google currently supports automatic ownership verification for many Google-hosted properties such as Blogger when the same account is used.
Step 3: Check Whether Your Blogger Property Already Exists
Before manually adding anything, check the property selector inside Search Console.
Google’s current verification documentation explains that new Blogger blogs may already be automatically verified in Search Console when you use the same Google Account that manages the blog.
If your Blogger property is already present, you do not need to repeat the verification process.
This is an important update because many old tutorials about how to connect Blogger to Google Search Console immediately tell users to copy verification meta tags into the Blogger theme.
That manual process may be unnecessary for a Blogger property that Google can already verify automatically.
Step 4: Add a Search Console Property if Needed
If your blog does not appear automatically, you can manually add it.
Open the property selector and choose:
+ Add property
Google Search Console currently supports two main website property types:
- Domain property
- URL-prefix property
Understanding these options is important when you connect Blogger to Google Search Console.
Domain Property
A Domain property can include all protocols and subdomains associated with the domain.
For example, a Domain property for:
example.com
can include variations such as:
- http://example.com
- https://example.com
- https://www.example.com
- other subdomains
Google’s official Domain property documentation explains that a Domain property is defined without a protocol or path.
URL-Prefix Property
A URL-prefix property covers only URLs that begin with the exact prefix you enter.
For example:
will not automatically include:
http://example.com/
or another subdomain.
You can read Google’s official URL-prefix property documentation for the current definition.
Which Property Type Should Blogger Users Choose?
If you are trying to connect Blogger to Google Search Console, either property type can work depending on your setup.
For a Blogger-hosted property, Google states that both Domain and URL-prefix properties can be added and verification may happen automatically when you are signed in with the same account that manages the Google-hosted property.
If you use your own custom domain and want one property covering all protocols and subdomains, a Domain property is generally more comprehensive.
If you specifically want data for one exact version such as:
a URL-prefix property can be useful.
Step 5: Verify Ownership if Google Does Not Verify It Automatically
In many cases, when you connect Blogger to Google Search Console using the same Google Account, Blogger ownership can be recognized automatically.
Google’s current Search Console verification guidance states that new Blogger blogs should generally be automatically verified. If the property does not appear automatically, adding it may still trigger automatic verification.
Older Blogger blogs may sometimes require another verification method.
Search Console supports several verification approaches depending on the property type and website configuration.
For example, URL-prefix properties can support methods such as:
- HTML tag
- HTML file
- Google Analytics
- Google Tag Manager
- DNS record
A Domain property normally relies on DNS verification, although Google-hosted Blogger properties can receive automatic verification under supported conditions.
Should You Add a Verification Meta Tag to the Blogger Theme?
Only if Search Console actually asks you to use that method.
Do not immediately modify your theme simply because an old guide says every user must add a google-site-verification tag.
If Google automatically verifies the Blogger property, no manual meta-tag step is necessary.
If Search Console specifically gives you an HTML-tag verification method, then carefully follow Google’s current instructions.
Step 6: Wait for Search Console Data
After you successfully connect Blogger to Google Search Console, do not expect a full dashboard immediately.
Google states that data can begin appearing within a few days. If a property still has no data after several days, possible reasons can include:
- The site has not yet been seen in Google Search
- The wrong property URL was added
- HTTP was added instead of HTTPS
- The wrong subdomain was selected
- The website has little or no search visibility yet
A new website may therefore need time before useful performance information appears.
Step 7: Submit Your Blogger Sitemap
After you connect Blogger to Google Search Console, sitemap submission is one of the most useful next steps.
A sitemap helps search engines discover important URLs on your website.
Inside Search Console, open:
Indexing → Sitemaps
Then enter the appropriate sitemap path provided by your Blogger setup.
Google’s official sitemap documentation explains that sitemaps can be submitted through the Search Console Sitemaps report.
Submitting a sitemap allows you to see whether Google processed it and whether errors were detected.
Does Submitting a Sitemap Guarantee Indexing?
No.
This is another important point when you connect Blogger to Google Search Console.
Google explicitly describes sitemap submission as a hint rather than a guarantee that every URL will be crawled or indexed.
Your pages still need to be accessible, useful, and eligible for indexing.
Do You Need to Add the Sitemap to Blogger Robots.txt?
No, you do not need to enable a custom robots.txt file simply because you connect Blogger to Google Search Console.
This is one of the most important corrections to older Blogger tutorials.
Blogger already generates default robots.txt behavior. Enabling custom robots.txt replaces that default configuration with your own rules.
Google’s current Blogger settings documentation specifically states that custom robots.txt content is used instead of the default robots.txt content.
Therefore:
Do not enable custom robots.txt only to submit a sitemap unless you have a specific technical reason to customize crawler rules.
Google Search Console itself provides a Sitemaps report for sitemap submission.
Google also explains that a sitemap URL can optionally be referenced in robots.txt, but this is simply one possible submission method—not a requirement.
If you want to understand crawler settings properly, read our Blogger SEO Settings Guide.
Step 8: Use URL Inspection for Important Pages
After you connect Blogger to Google Search Console, you can use URL Inspection to check individual pages.
Enter the complete URL of an article into the Search Console inspection bar.
URL Inspection can help you understand information about:
- Whether Google knows the URL
- Indexing status
- Canonical information
- Last crawl information
- Page availability
- Selected indexing details
If you recently published or significantly updated an important article, Search Console may also provide an option to request indexing.
Requesting indexing is not a ranking shortcut and does not guarantee that the page will be indexed immediately.
Step 9: Review the Search Performance Report
One of the biggest benefits after you connect Blogger to Google Search Console is access to search performance data.
Open the Performance report to examine:
- Total clicks
- Total impressions
- Average click-through rate
- Average position
- Queries
- Pages
- Countries
- Devices
This information can reveal SEO opportunities.
For example, suppose an article receives many impressions for a query but very few clicks. You might review whether the page title or search snippet accurately represents the content.
If another article is ranking near the first page for a relevant query, you might improve that article rather than immediately publishing a completely unrelated topic.
This is where learning how to connect Blogger to Google Search Console starts becoming genuinely useful for content strategy.
Step 10: Monitor Indexing and Technical Issues
After you connect Blogger to Google Search Console, periodically review the indexing and experience reports instead of checking only keyword positions.
Search Console can help identify situations such as:
- Pages that are not indexed
- Redirected URLs
- Duplicate or alternate URLs
- 404 pages
- Crawled but currently not indexed pages
- HTTPS issues
- Core Web Vitals concerns
Not every excluded URL is necessarily a problem.
For example, an intentionally redirected URL should not remain indexed as a separate page.
Evaluate each status in context rather than trying to force every Blogger URL into Google’s index.
Should You Submit HTTP, HTTPS, WWW, and Non-WWW Versions Separately?
Old tutorials about how to connect Blogger to Google Search Console often recommended adding every variation separately.
That advice depends on the property type.
If You Use a Domain Property
A Domain property automatically covers protocols and subdomains associated with the domain.
So you generally do not need separate properties purely for:
- HTTP
- HTTPS
- WWW
- Non-WWW
Google’s Domain property documentation confirms that a Domain property aggregates data across those variations.
If You Use a URL-Prefix Property
A URL-prefix property includes only URLs matching the exact prefix.
For example:
does not automatically include:
http://www.example.com/
or:
That distinction is important when you connect Blogger to Google Search Console.
Connect Blogger to Google Search Console With a Custom Domain
If your Blogger site uses a custom domain, you can still connect Blogger to Google Search Console.
For a long-term branded site, a Domain property can be useful because it captures multiple protocol and subdomain variations under one property.
Domain-property verification normally uses DNS. However, Google notes that Google-hosted services such as Blogger can receive automatic verification when the appropriate Google Account manages the property.
If automatic verification does not work, follow the verification method provided directly by Search Console.
Connect Blogger to Google Search Console With a Blogspot Address
You can also connect Blogger to Google Search Console when your site still uses a Blogspot URL.
For example:
If the blog is associated with the same Google Account used in Search Console, verification may happen automatically.
Check the property selector first before attempting manual verification.
Should You Edit Robots.txt After Connecting Search Console?
For most beginners, no.
Do not assume that you must edit robots.txt after you connect Blogger to Google Search Console.
Custom robots.txt is an advanced crawler-control feature. Incorrect directives can block important URLs or resources.
Leave Blogger’s default crawler configuration alone unless you understand exactly why you need a custom rule.
Google’s official robots.txt documentation explains how crawler rules work and should be used before making custom changes.
Should You Request Indexing for Every Blogger Post?
Once beginners connect Blogger to Google Search Console, they sometimes manually request indexing for every page.
That is usually unnecessary as a permanent workflow.
Google can discover public pages through:
- Internal links
- Sitemaps
- Normal crawling
- External links
URL Inspection is particularly useful when:
- You publish an important new page
- You make a major update
- You are troubleshooting indexing
- You want to inspect Google’s current information
Your long-term strategy should be a crawlable, well-linked website—not manually submitting every article forever.
Search Console Does Not Automatically Rank Your Blogger Blog
It is important to understand this after you connect Blogger to Google Search Console.
Search Console is a monitoring and diagnostic tool. Simply connecting your blog does not increase rankings.
For organic growth, you still need:
- Useful original content
- Clear search intent
- Good titles
- Logical headings
- Internal linking
- Optimized images
- Good website navigation
- Mobile usability
- Reasonable page performance
- Regular content updates
If you are still learning search optimization, read our guide explaining what search engine optimization is.
You can also review Google’s official SEO Starter Guide for current SEO fundamentals.
How Long Does Search Console Take to Show Data?
After you connect Blogger to Google Search Console, some information may take a few days to appear.
Do not assume the setup failed simply because the dashboard is initially empty.
Google’s current Search Console property documentation says data should generally begin appearing within a few days after a property is added.
A new site with little or no search visibility may naturally show limited data at first.
Common Blogger Search Console Mistakes
Avoid these common mistakes when you connect Blogger to Google Search Console.
Using the Wrong Google Account
Use the Google Account that manages the Blogger property whenever possible.
Adding the Wrong URL Prefix
If using a URL-prefix property, make sure HTTPS, WWW, and the hostname match your actual site.
Manually Adding Verification Code When Auto Verification Already Worked
Check whether the property is already verified before editing your Blogger theme.
Enabling Custom Robots.txt Without a Reason
Search Console sitemap submission does not require replacing Blogger’s default robots.txt configuration.
Expecting a Sitemap to Guarantee Indexing
A sitemap is a discovery signal, not an indexing guarantee.
Expecting Search Console to Improve Rankings Automatically
Search Console provides information. Your content and website improvements drive the actual SEO work.
Requesting Indexing Repeatedly
Repeated requests do not guarantee faster ranking or indexing.
Panicking About Every Excluded URL
Some excluded or redirected URLs are completely normal.
Connect Blogger to Google Search Console Checklist
Use this checklist when you connect Blogger to Google Search Console:
- Blogger blog is publicly accessible
- Visible to search engines is enabled
- Correct Google Account is being used
- Search Console opened
- Existing Blogger property checked first
- Correct property type selected if needed
- Ownership verified
- Correct HTTPS version confirmed
- Sitemap submitted
- Sitemap status checked
- Important URL inspected
- Performance report reviewed
- Indexing report reviewed
- Custom robots.txt left unchanged unless needed
- Search Console data given time to populate
If these steps are complete, you have covered the main process required to connect Blogger to Google Search Console.
Frequently Asked Questions About Blogger and Google Search Console
How do I connect Blogger to Google Search Console?
To connect Blogger to Google Search Console, sign in to Search Console with the Google Account that manages your Blogger blog. Check whether the property is already automatically verified. If it is not, add the correct Domain or URL-prefix property and complete the verification method Google provides.
Does Blogger automatically verify Search Console?
Google states that newer Blogger blogs may be automatically verified when you use the same Google Account in Blogger and Search Console. If the property does not appear automatically, add it and check whether automatic verification succeeds.
Should I use Domain or URL-prefix property for Blogger?
Both can work. A Domain property covers protocols and subdomains, while a URL-prefix property covers only URLs matching the exact prefix you enter.
Do I need to add an HTML verification tag to Blogger?
Not always. If Blogger verification happens automatically, an HTML verification tag is unnecessary. Use the tag only if Search Console specifically requires that verification method.
Should I submit a sitemap after connecting Blogger to Search Console?
Yes, submitting your sitemap through Search Console can help Google discover important URLs and allows you to monitor sitemap-processing status.
Does submitting a sitemap guarantee indexing?
No. Google states that sitemap submission is a hint and does not guarantee crawling or indexing.
Do I need custom robots.txt for Blogger Search Console?
No. You do not need to enable custom robots.txt simply to connect Blogger to Google Search Console or submit a sitemap. Blogger already provides default robots.txt behavior.
How long does Search Console take to show data?
Google says property data should generally begin appearing within a few days, although new sites with little search activity may initially show limited information.
Does Search Console improve Blogger SEO automatically?
No. Search Console is primarily a monitoring and diagnostic tool. You still need useful content, proper SEO, internal linking, good navigation, and technical health.
Can I connect a custom Blogger domain to Search Console?
Yes. You can connect Blogger to Google Search Console whether you use a Blogspot address or an appropriately configured custom domain.
Should I request indexing for every article?
No. Search engines can discover content naturally through internal links and sitemaps. Use URL Inspection mainly for important pages, updates, and troubleshooting.
Final Thoughts on Connecting Blogger to Google Search Console
Learning how to connect Blogger to Google Search Console is one of the most useful SEO setup tasks for a Blogger website.
The current process is easier than many old tutorials suggest. If you use the same Google Account for Blogger and Search Console, your Blogger property may already be automatically verified. If it is not, Search Console allows you to add the property and complete an appropriate verification method.
After you connect Blogger to Google Search Console, submit your sitemap, inspect important URLs, monitor search performance, and review indexing information.
Most importantly, do not automatically enable custom robots.txt or paste old crawler code simply because an outdated Blogger guide tells you to do so. Search Console sitemap submission works without replacing Blogger’s default crawler configuration.
Remember that Search Console does not create rankings by itself. Its real value is showing you what is happening so you can make better SEO decisions.
Once you connect Blogger to Google Search Console, use the data to improve content that already receives impressions, identify indexing problems, strengthen internal linking, and understand which topics are beginning to gain organic visibility.
For the next steps, read our Blogger SEO Settings Guide and Blogger Settings Guide. For the complete strategy covering content creation, SEO, traffic, engagement, and monetization, return to our Blogging and SEO Guide.